


How to exclude Referral Spam from Google Analytics

It can be super frustrating when you’re trying to figure out why your Analytics data is showing sudden spikes in traffic, drops in conversion rate, or inaccurate bounce rates – only to discover that it’s simply data from fake traffic.
Aside from implementation challenges, referral spam (also called “referrer spam” or “ghost traffic”) is the most common cause of inaccurate data for Analytics users. It’s constantly increasing in both volume and reach, and there’s no way to stop it from happening.
What we can do is block it from appearing in your Analytics, and regain the data integrity required to gather insights, report on performance, and make informed marketing decisions. You can get rid of almost all of it in one go using a ‘simple’ Filter in your Analytics profile.
But before we get to that, let’s start with an explanation of what referral spam is, where it comes from and how we come to only real solution for it.
In this article:
What is Referral Spam?
How Does Referral Spam Work?
Hostnames & How They’re Used
The Ultimate Referral Spam Filter
Setting up the Ultimate Referral Spam Filter
– Step 1: Identifying your valid hostnames
– Step 2: Create the list of valid hostnames you will accept
– Step 3: Create the Regular Expression to match these hostnames
– Step 4: Ensure that you use a Wildcard Regular Expression
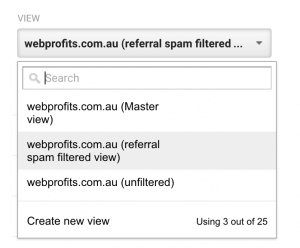
– Step 5: Create a New Profile View
– Step 6: Create the Ultimate Referral Spam Filter in the “Filtered” Profile View
– Step 7: Test the Filter
Follow Up & Testing
What is ‘referral spam’ or ‘ghost traffic’?
Referral traffic is recorded when traffic to your website is acquired from another website, usually from a hyperlink on that site that a visitor clicks.
The referral spam or ghost traffic issue occurs when hackers and spammers attempt to track false traffic in your Analytics profile to get your attention and cause you to visit the page or website from which the fake traffic is appearing, usually to either sell something or install malware.
To achieve this, they record the traffic as a referral so that they can insert the “referral” domain and URL for their target page or website into your Analytics profile for you to see.
These spammers can also execute fake Events or create false entries in other page-reliant dimensions, such as language. In these instances, ghost traffic is the more accurate name, however, Referrals is the most commonly affected report.
How does referral spam work?
There are a number of ways in which a spammer can record fake traffic on your website. By far, however, the simplest way to do this is using your Analytics property ID; the UA code you will see within your Analytics scripts in the form of UA-00000000-0.
But how?
It’s important to know that they are not targeting your website specifically – they usually do not even know who you are or what you do. To the spammers, this is irrelevant. Understanding that all Analytics properties have an ID in the form above makes it easy for spammers to cheat the system.
The spammers build a web server where they can run the Analytics javascript on pages within their own web environment. They can create an empty page with only the Analytics code, and will use the URL they want you to see as the referrer. The Analytics script on this page can then be set to cycle through every single property ID from UA-100000-1 to UA-99999999-20, essentially allowing them to hit every Analytics property on the planet.
Some spammers might crawl and index the UA code from actual websites so they can save on server space, and might use only valid IDs when they execute the Analytics on their fake server, but they could just as easily target all of them, ever.
Certainly, it can be a lot more technically complicated than this – but this is a simplified explanation of how they achieve the referral spam traffic.
Hostnames & how they’re used
Google automatically tracks the hostname for web pages on which their Analytics script loads. A hostname is essentially the subdomain that you see in a browser, such as webprofits.com.au, www.webprofits.com.au, webprofits.agency, some-subdomain.webprofits.com.au, etc.
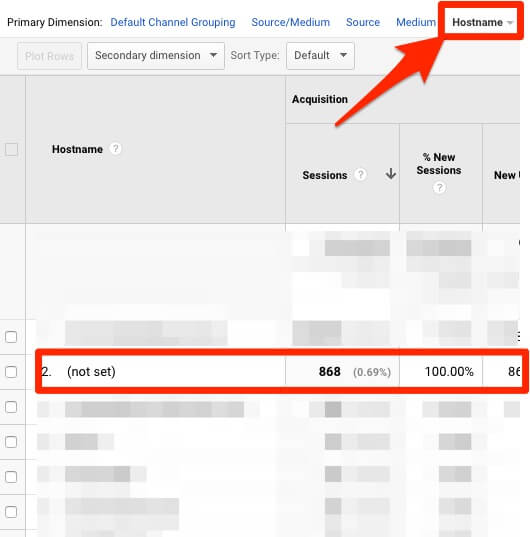
Some spammers forget this and execute the Analytics without a hostname set, and just focus on getting the referral domain into your Analytics. If you look in an Analytics report with the hostname dimension visible, this spam traffic appears as “(not set)”:
Other spammers are more aware of this and put a little more effort in to get a hostname to appear as well. To do this, they set a fake hostname for their fake web server in the same way you can edit the hosts file on your computer – for example, when you might set a specific domain to resolve a specific IP address for testing purposes on your computer only (like when you are testing a new website in staging). This is a common concept for developers.
The challenge for them is that they do not know which hostname corresponds to which of the ~2 billion possible property IDs they use, so they will use the same hostname/s across all of them. This helps us, because within your Analytics hostname report they appear under those hostnames.

You might say: but some of these are good sites, right?
Sure, but unless your Analytics property is on that website, the traffic is fake.
And this is the best way target referral spam.
The ultimate referral spam filter
There are some common mistakes made when trying to stop referral spam and ghost traffic. Some people go through many methods and tactics of addressing the issue. But knowing that the fake traffic will appear in your Analytics with either no hostname set or a fake hostname instead, we can target the referral spam in one hit – by excluding any traffic to a hostname that is not valid for your website.
If the hostname doesn’t match a valid subdomain for your web properties where the Analytics code is installed, we can exclude it using a hostname Filter.
Setting up the ultimate referral spam filter
Step 1: Identifying your valid hostnames
Firstly, it’s important to know all the possible valid hostnames for your web properties so that we do not filter out actual traffic.
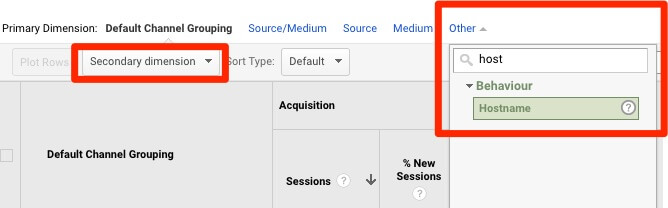
As long as you have sufficient traffic data available in your Analytics profile, you can switch the Primary Dimension to Hostname on most report pages, or add it as a Secondary Dimension if preferred. Just click the “Other” option for dimension, or the “Secondary dimension” dropdown and search for “hostname”:
Step 2: Create the list of valid hostnames you will accept
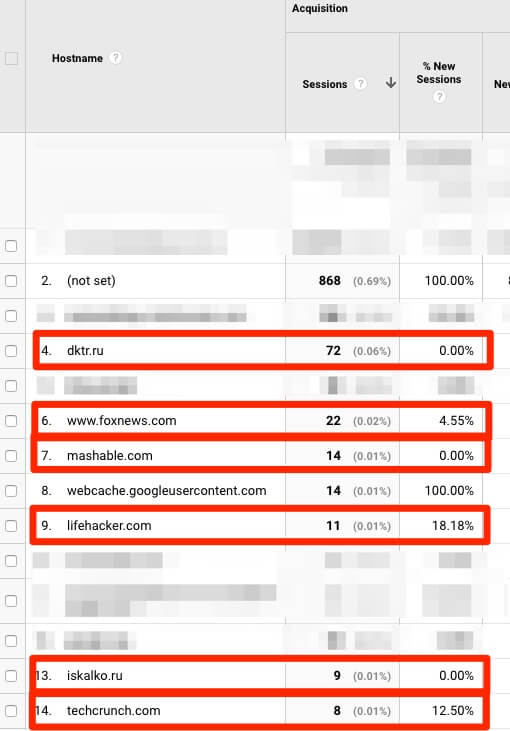
Get the list of reported hostnames and remove anything that does not match one of your properties, or a valid third-party hostname like Google’s translation or web cache subdomains:
![]()
![]()
Essentially, you are separating the spam hostnames, like the following examples, away from the list of valid hostname traffic received:
From even over 100 listed hostnames, you’ll likely end up with a relatively small number – something like this:
- webprofits.com.au
- subdomain1.webprofits.com.au
- subdomain2.webprofits.com.au
- translate.googleusercontent.com
- webcache.googleusercontent.com
- web.archive.org
Step 3: Create the Regular Expression to match these hostnames
Using this list, we want to create a regular expression that will allow Google’s filtering system to identify them easily. Looking at the list above, I want to create the simplest expression to match all of them.
I won’t go into the various elements of regular expressions as that’s a whole other topic… The most important character to know for this purpose is the separator “|”, achieved by pressing shift and the “\” key, usually above Enter on your keyboard. This separator, in regular expression language, means “or”.
So for an expression to match the list above, I want “webprofits.com.au OR subdomain1.webprofits.com.au OR subdomain2.webprofits.com.au …” written as:
webprofits.com.au|subdomain1.webprofits.com.au|subdomain2.webprofits.com.au|…
Step 4: Ensure that you use a Wildcard Regular Expression
We usually do not want Analytics to be limited to only what we type in, because at a later date we may decide to create a new subdomain or branded top-level domain with the same Analytics code and we don’t want to accidentally be excluding it from our reporting.
So to simplify the expression above to catch all valid instances, now and in the future, I might note that “webprofits.com.au”, or just “webprofits”, appears in a number of them, and “googleusercontent” or “google” appears in some more. So to match all of these in one short expression, I could use:
webprofits|google|archive.org
This ensures the filter allows for additional valid hostnames where applicable. Think of any other instances you or your team might use and be sure to include variations of those in this expression as well.
Step 5: Create a New Profile View
IMPORTANT: Once any traffic is filtered, you will not be able to recover it. Google excludes it from your profile and it is no longer recorded anywhere in that profile to be re-included later.
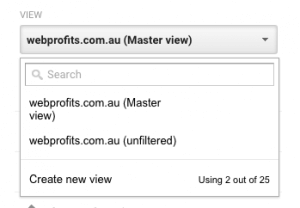
With this in mind, we want to create a duplicate profile View for your Analytics account in the Admin section.
The default View provided, visible in the right column on the Admin page, will be called “All Web Site Data”. You’ll want to either create a new profile that will be filtered, or you can filter the existing View and create a new one that’s the “Raw Data” unfiltered view. This choice is based on personal preference and reporting data.
If you filter the new view, it will not have any historical data so it will be accurate traffic but starting only from today. If you filter the old view, note that the comparison metrics when looking back before today will change instantly – traffic will drop, conversion rate will increase, etc. In the latter scenario, be sure to create an Annotation in the Analytics interface for today’s date, advising all users that the filter was created.
The end result should be that you have one profile with all of the data tracked and NO FILTERS set up. This ensures that you retain all data, regardless of any other factors, so that if you ever need to access data that has been filtered out, you can access it via the raw data.
Here is an example of how this might look in the Admin section of your account:
TIP: If in doubt, create a new View, even if it’s a 3rd or 4th one, to separate the spam-filtered profile from your main reporting View until you’re confident in the data it provides. This way you can test the filter in a non-essential environment.
You can do this easily by going into your current main view and clicking the Copy View button:
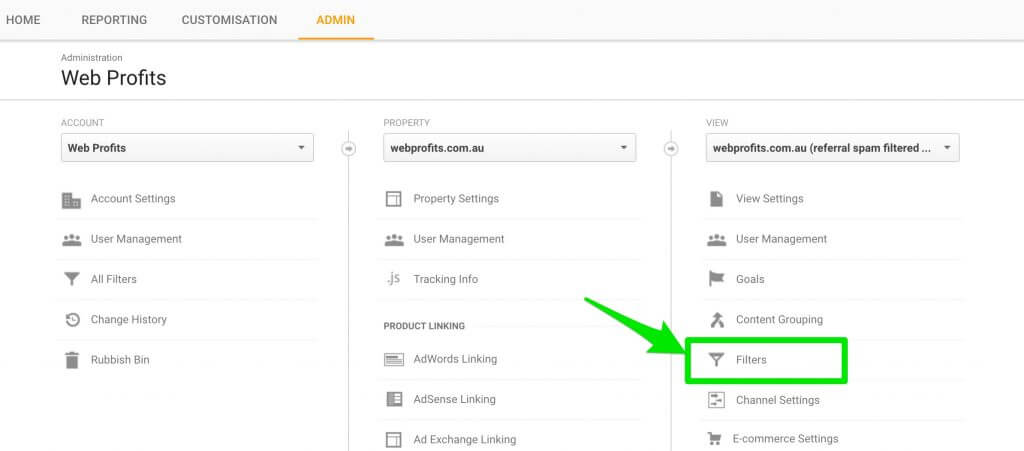
Step 6: Create the Ultimate Referral Spam Filter in the “Filtered” Profile View
With the filtered View you just created selected in the drop down on theright-handd side of the Admin section, click the Filters option:
Then click the Add Filter button:

Use the following settings, where you provide a name, set it to use a Custom filter type to “Include” the “Hostname” filter field, then enter your website’s valid hostname regular expression from Step 4 above into the Filter Pattern field:
![]()
The Verify option can be finicky, so it may not work, but try it anyway to see if you can identify the data that will be filtered out. Either way, if you have used a new View then there will be no harm to your existing data, so just click Save and see how it goes.
TIP: If you choose to filter the existing View and create a new raw data View, note that you can view the historical non-spam data by creating a custom Advanced Segment using the same filter settings.
Step 7: Test the Filter
After a few days, you should start to see the new data coming through without the invalid or missing hostnames, and without the fake traffic in your Referral reports. I’d love to say that all the spam would be gone immediately for everyone (and for most of you it will be!), but there are always going to be those extra-talented spammers that can find a way around it. If you find you are still receiving spam traffic, identify the hostname affected, the source of the ghost traffic or any other method of separating the spam, and add to the filter or create a new one.
Follow up & testing
As mentioned, the Ultimate Referral Spam Filter will catch almost everything! But it’s always best to keep a look out anyway, just in case.
If you find that you need help or if you prefer to have someone with experience implement these changes, please get in touch.
Related Articles:
- https://www.searchenginejournal.com/referrer-spam-get-rid/135855/
- https://www.mobipicker.com/block-lifehacker-com-referral-spam-google-analytics/
- http://blog.analytics-toolkit.com/2015/howto-fix-ghost-traffic-spam-rubbish-google-analytics/
- https://moz.com/blog/stop-ghost-spam-in-google-analytics-with-one-filter
- https://www.optimizesmart.com/geek-guide-removing-referrer-spam-google-analytics/
- https://megalytic.com/blog/how-to-filter-out-fake-referrals-and-other-google-analytics-spam


Super useful and detailed as usual – thanks WP team! 🙂
Hey Linda,
Thanks for commenting. Yes, you are correct – it’s unfortunately why I had to say it will remove ‘almost’ all fake traffic, and why it’s important to continue to check for referral spam after.
That said, this is still the best place to start because it will remove the vast majority of referral spam. It will then leave only a smaller percentage behind, if you’re unlucky enough to be hit with the real-hostname referral spam, but it will be much easier to identify and you can then setup another Filter to exclude the far smaller number of referral spam domains. If you attempt the referral exclusion first, it takes forever and leaves you open to far more spam ongoing, as we learnt from experience..
So definitely do not assume the valid hostname filter catches everything, but it’s the best place to start and will clean out the majority of spam for the majority of websites.
Regards,
George
Great articles, but this already isn’t working as a useful method. Spammers are now including the actual hostname that is attached to the URL to counteract this. See here, http://take.ms/j9qXh. Well known spam links such as motherboard.vice.com and blackhatworld.com using the correct hostname.